Introducing Donde
February 6, 2012

Donde is a GPS app for people who walk, for Samsung Wave S8500, Wave II, and Wave 3 mobile phones & compatible bada handsets.  DondeWQ is the same GPS app, but for Samsung Wave 525, 533, 575 and 723 models, the WQ models of the Wave.

Donde has rich online connectivity, but with a main direction screen that operates off-line, without needing an internet connection.

Donde

Are you a tourist? Donde can show you photos of sights near you. Select a photo and Donde can guide you there.

Are you a hiker? Donde can show you maps of the terrain, and lookup altitudes of waypoints.

Do you geocache? Donde lets you set GPS coordinates of caches directly from the geocache website.

Feeling weary? Donde can show you hotels nearby and book them.

Want to backtrack? Donde can navigate back to the GPS tag in photos taken along the route.

Orienteering? Donde can navigate fixed routes, and keep you on course.

Metric or US units. User friendly operation, for hiking, off-road navigating, wilderness treking, walking, hunting, geocaching, orienteering, cyclists, mountain biking, or tourist sightseeing.

DondeWQ

DondeWQ (formerly called DondeLite) can do most of the above too, it works on handsets that don’t have a magnetic compass.  All direction information is calculated from the changing GPS signals. As you walk, your position changes, and DondeWQ calculates your direction from that.

Also DondeWQ doesn’t have the ‘book a hotel here’ feature of Donde, and some other features work slightly differently.

DondeWQ supports landscape mode for the Wave 533’s landscape hardware keyboard too.

Those models of the handsets have a lower resolution screen, so the graphics are optimized to be clear at that lower resolution.

Donde & DondeWQ are also available in:

Français

Nederlands

Nederlands

한국어

한국어

Русский

Русский

中文 (简体)

中文 (简体)

正體中文 (繁體)

正體中文 (繁體)

ไทย

ไทย

Deutsch

Deutsch

Español

Español

Add Item Screen
April 17, 2011

There’s more to the add item screen than simply adding locations by GPS coordinates or by searching the name.

Add Waypoint Screen

Add Waypoint Form

The tabs long the top offer several powerful ways to add waypoints.

  1. The GPS tab, adds locations based on their GPS coordinates.
  2. The course tab, lets you add fixed headings and do calculations, e.g. add a waypoint 1 km North West of a location.
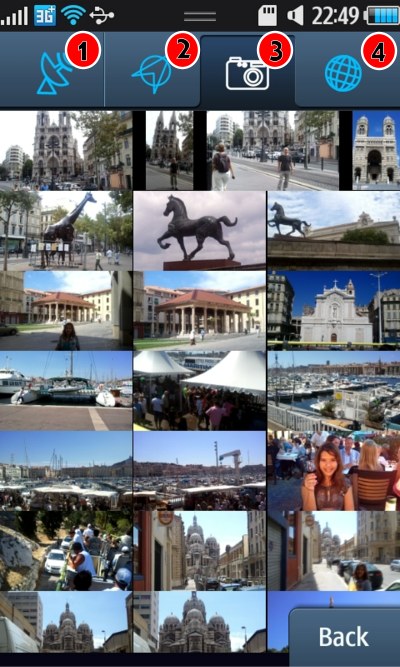
  3. The tab shown above, is the photo tab. These are your photos in the Samsung phone, and it lets you search for photos you took earlier by their location. The photos in the example above are photos from Marseille sorted by nearness to that church you see in the first picture.
  4. The fourth tab is the web content tab. To use this you need an internet connection. It offers a wealth of internet data related to the GPS location.

The photo tab, shown above, lets you photograph key places as you walk, you can then navigate back to those places by searching the photos. To do this the GPS tagging feature needs to be enabled in your Samsung camera settings.

  • Click add on the main compass menu.
  • Your are taken to the GPS tab with your GPS location in it.
  • Tap the camera tab, the photos in the camera are searched for images near that location.
  • You can also enter different latitude longitude on the GPS tab and search for that.
  • For this example, I entered ‘Marseille’ in the name field, tapped search to obtain the location for Marseille, then tapped the camera icon to pull up my photos of Marseille.
Photo Zoom Up Marseille

Photo Zoomed Up

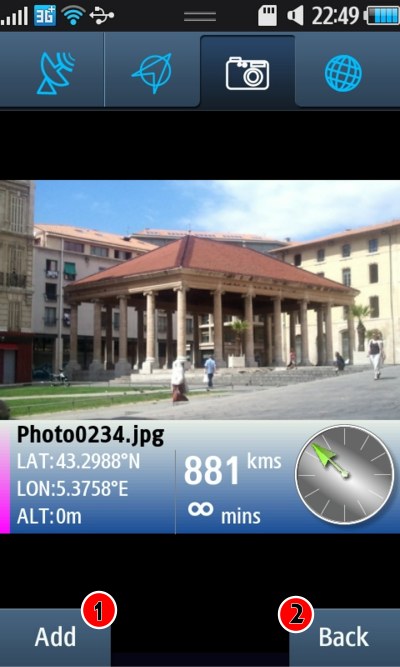
  • To add a photo as a waypoint, tap the small photo in the list.
  • The photo zooms up to fill the screen.
  • The GPS coordinates, distance from current location, direction and an estimate of how many minutes away it is, are shown.
  1. Tap Add to add it as a waypoint, the waypoint will be shown with a check on it in the list.
  2. Tap Back to return to the list.

Adding Geocache Locations
April 15, 2011

The forth tab on the Add form also lets you directly go to Geocaching.com. If you’re not familiar with Geocaching, it’s a game of hide and seek. Items are hidden at GPS location, and you find them, exploring new places along the way. Sometimes multi-caches are made, where a puzzle is solved along the way to find the next cache.

Geocaching

Adding Geocaching Locations

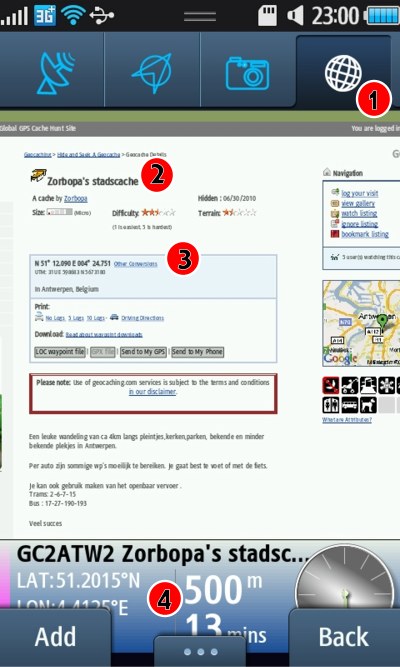
  1. Tap the globe to visit the web content (this part needs an internet connection, once you have the location to visit, you can navigate on compass and GPS alone without an internet connection).
  2. Tap Geocaching you will be taken to Geocaching.com website. You need to login or sign-up for an account to use this site. Geocaching will show a list of nearby caches, tap one you want to visit in the web page.
  3. Here you see the page has a geo-tag on it, showing the location of cache. Donde recognises the first of these on any page and offers it as a waypoint along the bottom of the page.
  4. Here the location of GC2ATW2, 500 metres south of my location is shown. I can tap Add to add this Geocache as a waypoint.

For multi-caches, add the later waypoints using the GPS tab as you solve each puzzle.